代码也写了几年了,设计模式处于看了忘,忘了看的状态,最近对设计模式有了点感觉,索性就再学习总结下吧。
大部分讲设计模式的文章都是使用的 Java、C++ 这样的以类为基础的静态类型语言,作为前端开发者,js 这门基于原型的动态语言,函数成为了一等公民,在实现一些设计模式上稍显不同,甚至简单到不像使用了设计模式,有时候也会产生些困惑。
下面按照「场景」-「设计模式定义」- 「代码实现」- 「更多场景」-「总」的顺序来总结一下,如有不当之处,欢迎交流讨论。
# 场景
示例代码来源于极客时间课程,React Hooks 核心原理与实战 (opens new window),顺便推荐一下,很不错的课程
平常开发中一定遇到过这样的场景:发起异步请求,loading 状态显示,获取数据并显示在界面上,如果遇到错误还会显示错误状态的相关展示。
为了方便运行,先写一个 mock 数据的方法:
const list = {
  page: 1,
  per_page: 6,
  total: 12,
  total_pages: 2,
  data: [
    {
      id: 1,
      email: "george.bluth@reqres.in",
      first_name: "windliang",
      last_name: "windliang",
      avatar: "https://reqres.in/img/faces/1-image.jpg"
    },
    {
      id: 2,
      email: "janet.weaver@reqres.in",
      first_name: "Janet",
      last_name: "Weaver",
      avatar: "https://reqres.in/img/faces/2-image.jpg"
    },
    {
      id: 3,
      email: "emma.wong@reqres.in",
      first_name: "Emma",
      last_name: "Wong",
      avatar: "https://reqres.in/img/faces/3-image.jpg"
    }
  ]
};
export const getDataMock = () =>
  new Promise((resolve, reject) => {
    setTimeout(() => {
      resolve(list);
    }, 2000);
  });
然后是列表组件:
import React from "react";
import { getDataMock } from "./mock";

export default function UserList() {
  // 使用三个 state 分别保存用户列表,loading 状态和错误状态
  const [users, setUsers] = React.useState([]);
  const [loading, setLoading] = React.useState(false);
  const [error, setError] = React.useState(null);

  // 定义获取用户的回调函数
  const fetchUsers = async () => {
    setLoading(true);
    try {
      const res = await getDataMock();
      // 请求成功后将用户数据放入 state
      setUsers(res.data);
    } catch (err) {
      // 请求失败将错误状态放入 state
      setError(err);
    }
    setLoading(false);
  };

  return (
    <div className="user-list">
      <button onClick={fetchUsers} disabled={loading}>
        {loading ? "Loading..." : "Show Users"}
      </button>
      {error && <div style={{ color: "red" }}>Failed: {String(error)}</div>}
      <br />
      <ul>
        {users &&
          users.length > 0 &&
          users.map((user) => {
            return <li key={user.id}>{user.first_name}</li>;
          })}
      </ul>
    </div>
  );
}
效果就是下边的样子:

事实上,可能会有很多组件都需要这个过程,loading -> 展示数据 -> loading 消失、错误展示,每一个组件单独维护这一套逻辑就太麻烦了,此时就可以用到模版模式了。
# 模版模式
看下 维基百科 (opens new window) 给到的定义:
The template method is a method in a superclass, usually an abstract superclass, and defines the skeleton of an operation in terms of a number of high-level steps. These steps are themselves implemented by additional helper methods in the same class as the template method.
The helper methods may be either abstract methods (opens new window), in which case subclasses are required to provide concrete implementations, or hook methods (opens new window), which have empty bodies in the superclass. Subclasses (opens new window) can (but are not required to) customize the operation by overriding (opens new window) the hook methods. The intent of the template method is to define the overall structure of the operation, while allowing subclasses to refine, or redefine, certain steps.[2] (opens new window)
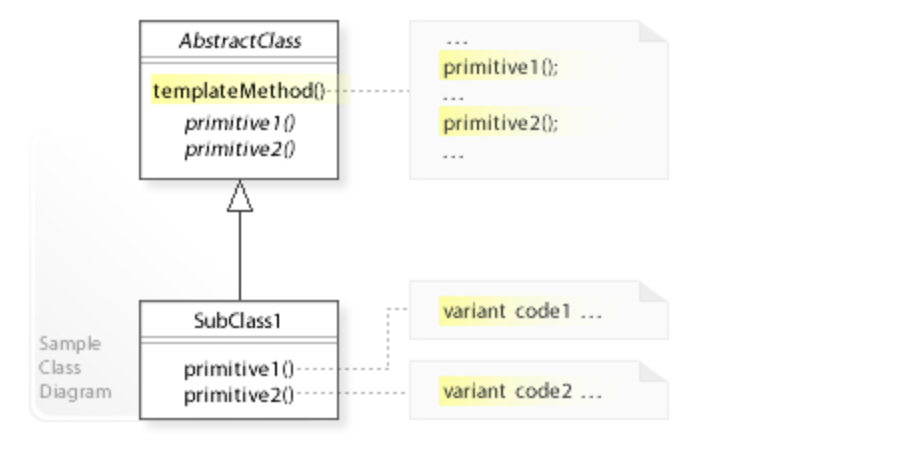
简单来说,模版模式就是抽象父类提供一个骨架方法,里边会调用一些抽象方法或者空方法,抽象方法/空方法由子类自行去实现,可以看一下 UML 类图。

举一个做饭的简单例子,看一下代码示例:
abstract class Cook {
    public abstract void prepareIngredients();
    public abstract void cooking();
    public void prepare() {
        System.out.println("准备干净锅");
    }
    /* A template method : */
    public final void startCook() {
        prepare();
        prepareIngredients();
        cooking();
    }
}

class TomatoEgg extends Cook {
    @Override
    public void prepareIngredients() {
        System.out.println("拌鸡蛋、切西红柿");
    }
    @Override
    public void cooking() {
        System.out.println("热油,炒鸡蛋,出锅");
        System.out.println("少油,炒西红柿,加盐、加糖,加鸡蛋炒");
        System.out.println("出锅");
    }

}

class Potato extends Cook {
    @Override
    public void prepareIngredients() {
        System.out.println("切土豆片、腌肉");
    }
    @Override
    public void cooking() {
        System.out.println("热油,炒土豆片,出锅");
        System.out.println("加油,蒜姜辣椒爆香,炒肉、加土豆炒");
        System.out.println("加生抽、加盐、加老抽上色");
        System.out.println("出锅");
    }

}

public class Main {
    public static void main(String[] args) {
        Cook tomatoEgg = new TomatoEgg();
        tomatoEgg.startCook();
        Cook potato = new Potato();
        potato.startCook();

        System.out.println("开吃!");
    }
}
/*
准备干净锅
拌鸡蛋、切西红柿
热油,炒鸡蛋,出锅
少油,炒西红柿,加盐、加糖,加鸡蛋炒
出锅
准备干净锅
切土豆片、腌肉
热油,炒土豆片,出锅
加油,蒜姜辣椒爆香,炒肉、加土豆炒
加生抽、加盐、加老抽上色
出锅
开吃!
*/
Cook 类提供骨架方法 startCook ,编写了做饭的主要流程,其他抽象方法 prepareIngredients 、 cooking 下放给子类去实现自己独有的逻辑。
让我们用 js 来改写一下:
const Cook = function () {};
Cook.prototype.prepare = function () {
    console.log("准备干净锅");
};
Cook.prototype.prepareIngredients = function () {
    throw new Error("子类必须重写 prepareIngredients 方法");
};
Cook.prototype.cooking = function () {
    throw new Error("子类必须重写 cooking 方法");
};
Cook.prototype.startCook = function () {
    this.prepare();
    this.prepareIngredients();
    this.cooking();
};
const TomatoEgg = function () {};
TomatoEgg.prototype = new Cook();
TomatoEgg.prototype.prepareIngredients = function () {
    console.log("拌鸡蛋、切西红柿");
};
TomatoEgg.prototype.cooking = function () {
    console.log("热油,炒鸡蛋,出锅");
    console.log("少油,炒西红柿,加盐、加糖,加鸡蛋炒");
    console.log("出锅");
};

const Potato = function () {};
Potato.prototype = new Cook();
Potato.prototype.prepareIngredients = function () {
    console.log("切土豆片、腌肉");
};
Potato.prototype.cooking = function () {
    console.log("热油,炒土豆片,出锅");
    console.log("加油,蒜姜辣椒爆香,炒肉、加土豆炒");
    console.log("加生抽、加盐、加老抽上色");
    console.log("出锅");
};

const tomatoEgg = new TomatoEgg();
tomatoEgg.startCook();

const potato = new Potato();
potato.startCook();

console.log("开吃!");
上边是 js 照猫画虎的去按照 java 的形式去实现模版方法,作为函数是一等公民的 js ,也许我们可以换一种方式。
# js 的模版模式
模板模式是一个方法中定义一个算法骨架,可以让子类在不改变算法整体结构的情况下,重新定义算法中的某些步骤。
原始定义中通过抽象类继承实现,但由于 js 并没有抽象类,实现起来也有些繁琐,也许我们可以通过组合的方式,将需要的方法以参数的形式传给算法骨架。
const Cook = function ({ prepareIngredients, cooking }) {
    const prepare = function () {
        console.log("准备干净锅");
    };
    const startCook = function () {
        prepare();
        prepareIngredients();
        cooking();
    };
    return {
        startCook,
    };
};

const tomatoEgg = Cook({
    prepareIngredients() {
        console.log("拌鸡蛋、切西红柿");
    },
    cooking() {
        console.log("热油,炒鸡蛋,出锅");
        console.log("少油,炒西红柿,加盐、加糖,加鸡蛋炒");
        console.log("出锅");
    },
});
tomatoEgg.startCook();

const potato = Cook({
    prepareIngredients() {
        console.log("切土豆片、腌肉");
    },
    cooking() {
        console.log("热油,炒土豆片,出锅");
        console.log("加油,蒜姜辣椒爆香,炒肉、加土豆炒");
        console.log("加生抽、加盐、加老抽上色");
        console.log("出锅");
    },
});
potato.startCook();

console.log("开吃!");
通过组合的方式,代码会变得更加清爽简单,不需要再定义 TomatoEgg 类和 Potato 类,只需要简单的传参。
但 js 实现的只能是带引号的模版方法了,一方面我们并没有通过继承去实现,另一方面 js 并没有抽象类、抽象方法的功能,如果某些方法没有实现,并不能在代码编写阶段发现,到了运行阶段才会收到 Error。
# 代码实现
回到开头异步请求的例子,我们可以定义一个请求 Hook ,将 loaing 处理、数据返回处理这些步骤封装起来,外界只需要传递请求的方法即可。
import { useState, useCallback } from "react";
export default (asyncFunction) => {
  // 设置三个异步逻辑相关的 state
  const [data, setData] = useState(null);
  const [loading, setLoading] = useState(false);
  const [error, setError] = useState(null);
  // 定义一个 callback 用于执行异步逻辑
  const execute = useCallback(() => {
    // 请求开始时,设置 loading 为 true,清除已有数据和 error 状态
    setLoading(true);
    setData(null);
    setError(null);
    return asyncFunction()
      .then((response) => {
        // 请求成功时,将数据写进 state,设置 loading 为 false
        setData(response);
        setLoading(false);
      })
      .catch((error) => {
        // 请求失败时,设置 loading 为 false,并设置错误状态
        setError(error);
        setLoading(false);
      });
  }, [asyncFunction]);

  return { execute, loading, data, error };
};
业务调用的地方使用上边的 Hook 即可。
import React from "react";
import useAsync from "./useAsync";
import { getDataMock } from "./mock";

export default function UserList() {
  // 通过 useAsync 这个函数,只需要提供异步逻辑的实现
  const { execute: fetchUsers, data: users, loading, error } = useAsync(
    async () => {
      const res = await getDataMock();
      return res.data;
    }
  );

  return (
    <div className="user-list">
      <button onClick={fetchUsers} disabled={loading}>
        {loading ? "Loading..." : "Show Users"}
      </button>
      {error && <div style={{ color: "red" }}>Failed: {String(error)}</div>}
      <br />
      <ul>
        {users &&
          users.length > 0 &&
          users.map((user) => {
            return <li key={user.id}>{user.first_name}</li>;
          })}
      </ul>
    </div>
  );
}
完整代码放到 Sandxox (opens new window) 上了,感兴趣的同学也可以去运行下。
# 更多场景
「模版方法」在框架中会更常见,比如我们平常写的 vue ,它的内部定义了各个生命周期的执行顺序,然后对我们开放了生命周期的钩子,可以执行我们自己的操作。
<script>
  var vm = new Vue({
    el: '#app',
    data: {
      message: 'Vue的生命周期'
    },
    beforeCreate: function() {
    },
    created: function() {
    },
    beforeMount: function() {
    },
    mounted: function() {
    },
    beforeUpdate: function () {
    },
    updated: function () {
    },
    beforeDestroy: function () {
    },
    destroyed: function () {
    }
  })
</script>
「模版方法」如果再说的宽泛一点,ElementUI 的 dialog 也可以当作模版方法。
<el-dialog
  title="提示"
  :visible.sync="dialogVisible"
  width="30%"
  :before-close="handleClose">
  <span>这是一段信息</span>
  <span slot="footer" class="dialog-footer">
    <el-button @click="dialogVisible = false">取 消</el-button>
    <el-button type="primary" @click="dialogVisible = false">确 定</el-button>
  </span>
</el-dialog>
el-dialog 实现了 Dialog 的基本样式和行为,并且通过 slot 以供扩展,让我们实现自己个性的东西。
# 总
虽然在 js 中我们并不能真正实现模版模式,但模版模式的作用我们还是实现了,践行了「开放关闭原则」:
对扩展开放: 可以通过传入不同的参数,实现不同的应用需求。
对修改关闭: 模版方法通过闭包的形式,内部的属性、方法外界并不能修改。
模版方法同样提升了复用能力,我们可以把公共的部分提取到模版方法中,业务方就不需要自己再实现一次了。